How to Deploy Real-ESRGAN with Docker: Complete Image Upscaling Tutorial
From pulling the Docker image to batch-upscaling with face enhancement and anime models — this tutorial covers every step of deploying Real-ESRGAN.

How to Deploy Real-ESRGAN with Docker: Complete Upscaling Tutorial
This tutorial walks you through deploying Real-ESRGAN with Docker — from pulling the image to batch-upscaling folders of images, using face enhancement, and the specialized anime model. No prior ML experience needed.
🚀 Want to deploy Real-ESRGAN yourself?
Docker configs, system requirements, and installation guides — all on one page.
View Real-ESRGAN Tool Page →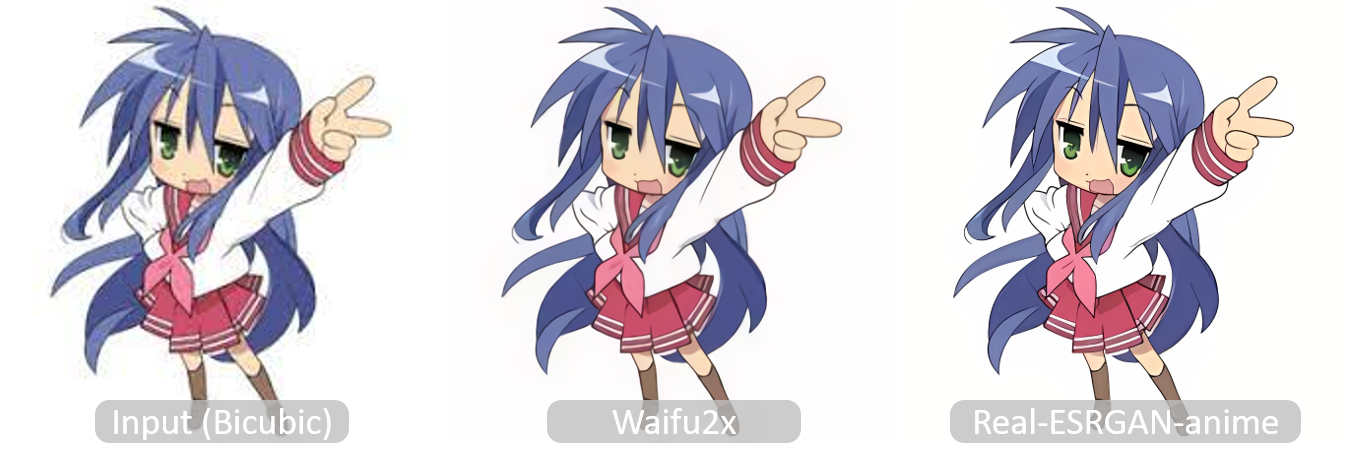
Prerequisites
- Docker installed on your system
- NVIDIA GPU with 4GB+ VRAM (optional but recommended — CPU works too)
- NVIDIA Container Toolkit (for GPU acceleration)
- Images you want to upscale
Step 1: Pull the Docker Image
docker pull wpafbo79/real-esrgan:latestThis image comes with Real-ESRGAN, all model weights, and dependencies pre-installed. No need to download models separately.
Step 2: Create docker-compose.yml
version: '3.8'
services:
  real-esrgan:
    image: wpafbo79/real-esrgan:latest
    volumes:
      - ./inputs:/inputs
      - ./outputs:/outputs
      - ./models:/models
    deploy:
      resources:
        reservations:
          devices:
            - driver: nvidia
              count: all
              capabilities: [gpu]
What each volume does:
./inputs— place images you want to upscale here./outputs— enhanced images will appear here./models— optional: custom model weights
Step 3: Upscale Images
Basic Upscaling (4x)
mkdir -p inputs outputs
cp your_images/*.png inputs/

# Run one-time upscaling
docker compose run real-esrgan \
  -i /inputs -o /outputs -n RealESRGAN_x4plus
With Face Enhancement
docker compose run real-esrgan \
  -i /inputs -o /outputs -n RealESRGAN_x4plus --face_enhance
Add --face_enhance when your images contain people. This activates the integrated GFPGAN model for much better facial detail restoration.
Anime & Digital Art
docker compose run real-esrgan \
  -i /inputs -o /outputs -n RealESRGAN_x4plus_anime
Use the anime model for illustrations, manga, and anime-style artwork. It preserves clean lines and flat colors much better than the general model.
2x Upscaling
docker compose run real-esrgan \
  -i /inputs -o /outputs -n RealESRGAN_x2plus
For 2x upscaling, use the x2plus model. For 3x, use -s 3 with the x4plus model.
Step 4: Processing Large Batches
# Upsscale an entire folder of 1000+ images
docker compose run real-esrgan \
  -i /inputs -o /outputs \
  -n RealESRGAN_x4plus \
  -s 4 \
  --tile 512 \
  --face_enhance
The --tile 512 parameter is important for large images or limited VRAM:
--tile 0— no tiling (default, needs more VRAM)--tile 512— process in 512px tiles (works with 4GB VRAM)--tile 256— smaller tiles (for 2GB VRAM)
Step 5: Using the Python API in Docker
For programmatic access, you can run Python scripts inside the container:
docker compose run --entrypoint python real-esrgan << 'EOF'
from realesrgan import RealESRGANer
from basicsr.archs.rrdbnet_arch import RRDBNet
import cv2

model = RRDBNet(num_in_ch=3, num_out_ch=3, num_feat=64,
                num_block=23, num_grow_ch=32, scale=4)
upsampler = RealESRGANer(
    scale=4, model_path='weights/RealESRGAN_x4plus.pth',
    model=model, tile=512, tile_pad=10, pre_pad=0, half=True
)

img = cv2.imread('/inputs/photo.png', cv2.IMREAD_UNCHANGED)
output, _ = upsampler.enhance(img, outscale=4)
cv2.imwrite('/outputs/photo_4x.png', output)
print("Done!")
EOF
Troubleshooting
Problem: "CUDA out of memory"
Solution: Use --tile 256 or --tile 128 to process images in smaller tiles. Also try --fp32 instead of default fp16 if you have enough VRAM.
Problem: Output images look too smooth/artificial
Solution: For photos, add --face_enhance. For non-face images, try the anime model — sometimes it produces more natural-looking results even for non-anime content.
Problem: Very slow on CPU
Solution: CPU processing takes 10-30 seconds per image. For faster CPU processing, use the x2 model instead of x4, or use --tile 512 to limit memory usage.
Problem: "Model file not found"
Solution: The Docker image includes pre-trained models. If using custom models, mount them in ./models and specify the path with -m /models/your_model.pth.
Problem: Colored border artifacts on upscaled images
Solution: Increase --tile_pad to 20 or 30 (default is 10). This adds more padding between tiles to reduce visible seams.
Advanced: Building a Web API
Want to expose Real-ESRGAN as an HTTP API? Here's a simple Flask wrapper:
# Save as app.py and run inside the container
from flask import Flask, request, send_file
from realesrgan import RealESRGANer
from basicsr.archs.rrdbnet_arch import RRDBNet
import cv2, tempfile, os

app = Flask(__name__)
model = RRDBNet(num_in_ch=3, num_out_ch=3, num_feat=64,
                num_block=23, num_grow_ch=32, scale=4)
upsampler = RealESRGANer(scale=4, model_path='weights/RealESRGAN_x4plus.pth',
                          model=model, tile=512, half=True)

@app.route('/upscale', methods=['POST'])
def upscale():
    file = request.files['image']
    scale = int(request.form.get('scale', 4))
    tmp_in = tempfile.NamedTemporaryFile(suffix='.png', delete=False)
    file.save(tmp_in.name)
    img = cv2.imread(tmp_in.name, cv2.IMREAD_UNCHANGED)
    output, _ = upsampler.enhance(img, outscale=scale)
    tmp_out = tempfile.NamedTemporaryFile(suffix='.png', delete=False)
    cv2.imwrite(tmp_out.name, output)
    return send_file(tmp_out.name, mimetype='image/png')

app.run(host='0.0.0.0', port=5000)
Conclusion
With Docker, Real-ESRGAN is trivially easy to deploy. Whether you need to upscale a single photo or batch-process thousands of images, the Docker container handles everything — model loading, GPU management, and output generation. The --face_enhance and anime model options give you the flexibility to handle any type of image with optimal results.
🚀 Explore Real-ESRGAN on Run This Ai
Docker Compose configs, system requirements, installation guides, and more — all in one place.
View Real-ESRGAN Tool Page →